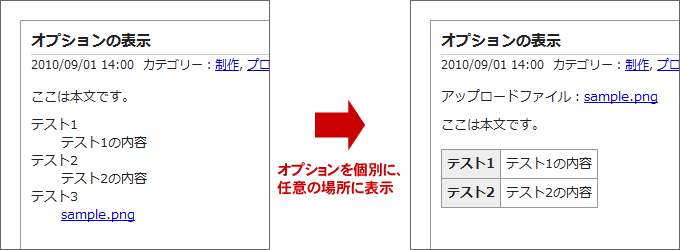
オプションを個別に表示する
詳細
「管理メニュー」→「システム」→「オプション管理」で、あらかじめ以下のオプションが登録されているとします。
| ID | オプション名 | 種類 |
|---|---|---|
| test1 | テスト1 | 一行入力 |
| test2 | テスト2 | 複数行入力 |
| test3 | テスト3 | アップロード |
エントリーやページを登録する際、これらのオプションを入力すると本文の下にまとめて表示されます。ですがテンプレートを編集すれば、任意の場所に個別に表示することができます。(ただしオプション項目を増減させたときは、その都度テンプレート側の編集も必要になります。)
標準のテンプレートでは、登録したオプションを表示する箇所は
- エントリー一覧表示画面(初期画面)
- エントリー個別表示画面
- ページ個別表示画面
の3箇所あります。
エントリー一覧表示画面
エントリー一覧画面での表示を調整する場合、templates/internals/default/default.html の130行目あたりにある
<!--{if $entry_associates[$entry.id].option}-->
<dl>
  <!--{foreach from=$freo.refer.options|smarty:nodefaults item='option'}-->
  <!--{if $entry_associates[$entry.id].option[$option.id]}-->
  <dt>{$option.name}</dt>
    <dd><!--{if $option.type == 'file'}--><a href="{$freo.core.http_url}{$smarty.const.FREO_FILE_DIR}entry_options/{$entry.id}/{$option.id}/{$entry_associates[$entry.id].option[$option.id]}">{$entry_associates[$entry.id].option[$option.id]}</a><!--{else}-->{$entry_associates[$entry.id].option[$option.id]|nl2br}<!--{/if}--></dd>
  <!--{/if}-->
  <!--{/foreach}-->
</dl>
<!--{/if}-->
この部分を、一例ですが以下のように変更します。
<!--{if $entry_associates[$entry.id].option}-->
<table summary="オプション">
  <tr>
    <th>{$freo.refer.options.test1.name}</th>
    <td>{$entry_associates[$entry.id].option.test1}</td>
  </tr>
  <tr>
    <th>{$freo.refer.options.test2.name}</th>
    <td>{$entry_associates[$entry.id].option.test2|nl2br}</td>
  </tr>
  <tr>
    <th>{$freo.refer.options.test3.name}</th>
    <td><a href="{$freo.core.http_url}{$smarty.const.FREO_FILE_DIR}entry_options/{$entry.id}/test3/{$entry_associates[$entry.id].option.test3}">{$entry_associates[$entry.id].option.test3}</a></td>
  </tr>
</table>
<!--{/if}-->これで、テーブルのセルに個別にオプションが表示されます。(test1・test2・test3 のIDはそれぞれ自分で登録したIDに置き換えてください。)
以下、コードの意味を簡単に解説します。
最初と最後の行にある <!--{if $entry_associates[$entry.id].option}--> ~ <!--{/if}--> は「何かオプションが登録されていれば」という意味です。この2行を削除すると、オプションが一件も登録されていなくてもテーブルが表示されるようになります。
{$freo.refer.options.test1.name} や {$freo.refer.options.test2.name} にはオプション名が表示されます。test1 や test2 は、管理画面から登録したオプションIDです。つまり、
{$freo.refer.options.オプションID.name}と書けばオプション名を表示することができます。
{$entry_associates[$entry.id].option.test1} にはオプションの登録内容が表示されます。test1 は、管理画面から登録したオプションIDです。つまり、
{$entry_associates[$entry.id].option.オプションID}と書けばオプションの登録内容を表示することができます。ただし登録内容をそのまま表示するだけなので、複数行入力欄での改行などは反映されません。
オプションの「種類」を「複数行入力」「セレクトボックス」「ラジオボタン」「チェックボックス」のいずれかに設定した場合、test2 のように |nl2br を付加すると改行が反映されます。
オプションの「種類」を「アップロード」に設定した場合、test3 のようにファイルへのリンクタグも記載しておくといいでしょう。
これらのコードは、テンプレートエンジンであるSmartyの文法に従って記述する必要があります。テンプレート編集の注意点はデザインの変更時の注意点を参照してください。
エントリー個別表示画面
同じ要領で、エントリー個別表示画面での表示を調整する場合、templates/internals/view/default.html の60行目あたりにある
<!--{if $entry_associate.option}-->
<dl>
  <!--{foreach from=$freo.refer.options|smarty:nodefaults item='option'}-->
  <!--{if $entry_associate.option[$option.id]}-->
  <dt>{$option.name}</dt>
    <dd><!--{if $option.type == 'file'}--><a href="{$freo.core.http_url}{$smarty.const.FREO_FILE_DIR}entry_options/{$entry.id}/{$option.id}/{$entry_associate.option[$option.id]}">{$entry_associate.option[$option.id]}</a><!--{else}-->{$entry_associate.option[$option.id]|nl2br}<!--{/if}--></dd>
  <!--{/if}-->
  <!--{/foreach}-->
</dl>
<!--{/if}-->
この部分を、一例ですが以下のように変更します。
<!--{if $entry_associate.option}-->
<table summary="オプション">
  <tr>
    <th>{$freo.refer.options.test1.name}</th>
    <td>{$entry_associate.option.test1}</td>
  </tr>
  <tr>
    <th>{$freo.refer.options.test2.name}</th>
    <td>{$entry_associate.option.test2|nl2br}</td>
  </tr>
  <tr>
    <th>{$freo.refer.options.test3.name}</th>
    <td><a href="{$freo.core.http_url}{$smarty.const.FREO_FILE_DIR}entry_options/{$entry.id}/test3/{$entry_associate.option.test3}">{$entry_associate.option.test3}</a></td>
  </tr>
</table>
<!--{/if}-->
エントリー一覧画面の場合と少しコードが異なるので注意してください。ただし、基本的な考え方は同じです。
ページ個別表示画面
同じ要領で、ページ個別表示画面での表示を調整する場合、templates/internals/page/default.html の50行目あたりにある
<!--{if $page_associate.option}-->
<dl>
  <!--{foreach from=$freo.refer.options|smarty:nodefaults item='option'}-->
  <!--{if $page_associate.option[$option.id]}-->
  <dt>{$option.name}</dt>
    <dd><!--{if $option.type == 'file'}--><a href="{$freo.core.http_url}{$smarty.const.FREO_FILE_DIR}page_options/{$page.id}/{$option.id}/{$page_associate.option[$option.id]}">{$page_associate.option[$option.id]}</a><!--{else}-->{$page_associate.option[$option.id]|nl2br}<!--{/if}--></dd>
  <!--{/if}-->
  <!--{/foreach}-->
</dl>
<!--{/if}-->
この部分を、一例ですが以下のように変更します。
<!--{if $page_associate.option}-->
<table summary="オプション">
  <tr>
    <th>{$freo.refer.options.test1.name}</th>
    <td>{$page_associate.option.test1}</td>
  </tr>
  <tr>
    <th>{$freo.refer.options.test2.name}</th>
    <td>{$page_associate.option.test2|nl2br}</td>
  </tr>
  <tr>
    <th>{$freo.refer.options.test3.name}</th>
    <td><a href="{$freo.core.http_url}{$smarty.const.FREO_FILE_DIR}page_options/{$page.id}/test3/{$page_associate.option.test3}">{$page_associate.option.test3}</a></td>
  </tr>
</table>
<!--{/if}-->
ページ個別表示画面の場合と少しコードが異なるので注意してください。ただし、基本的な考え方は同じです。
